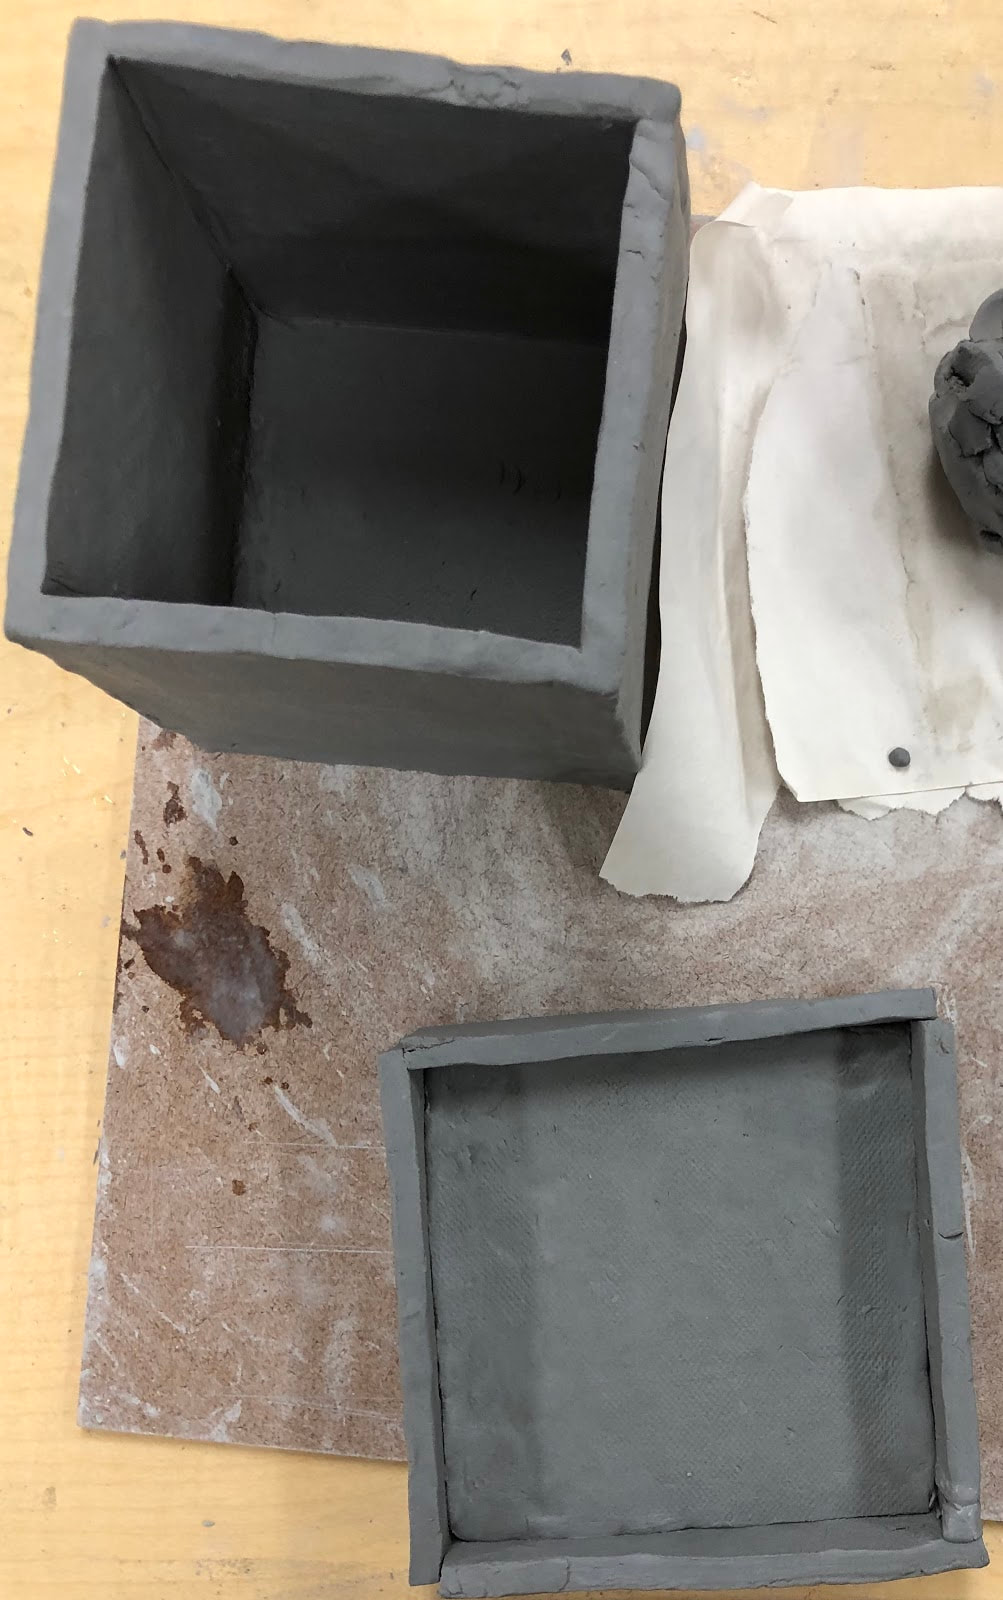
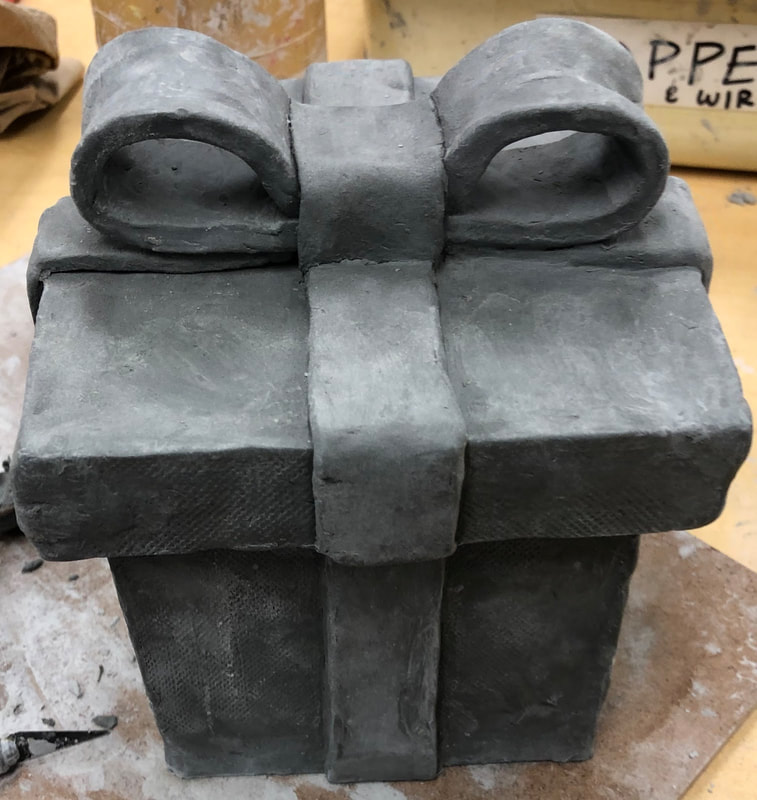
  My plan with this piece is the make it into a present or gift box, made out of clay. I want the lid to be just like a gift box lid would be like; I want the lid to "lock" and look like how a gift box's lid would a with the extra pieces on the the four sides that are attached to a square piece that is a little bigger than one side of the box, length and width wise, and the extra piece hang over the side of the box and allowing a snug fit and for the lid to "lock". I also want to add a knot/bow on top with four strands of ribbons made out of clay, going up and down vertically in the center, each on one of four sides of the box, the strands of ribbon on the side of the box and lid will be disconnected so you can actually lift the lid off, and all four clay strands of ribbon will meet or connect to a clay knot/bow in the center of the lid on top. To finish I plan to glaze the stands of ribbon and the know white or black and the actual box will be either blue or beige and after the glaze is fired, I plan to paint on some intricate designs of plants and patterns on the box. Something that I found that was difficult about clay is that it dries quite quickly and if it's just even a little dry, barely leather hard, it very hard to work with and it's hard to get it wet and to the right consistency that you are able to mold and use it properly again. If it's barely leather hard and you try mold it and work with it, it cracks and is't very moldable and if you try to wetting it with water, all it does is that the clay just becomes a muddy mess and if you try to roll out a ball of this barely leather hard clay, you end up with a long rolled out piece of clay with a bunch of cracks in it. Also, thin pieces of clay, like my ribbons o small pieces you want to add and didn't have the time to attach and have to leave overnight or over the weekend, are hard to keep moist and usually for me just dry out or are so dry to the point that they crumble and are no longer moldable. Also with clay, it's hard the repeatedly make similar things and stay consistent, like my ribbons, to keep them the same length and thickness and you had to constantly make adjustments. Another difficulty is that if a large chunk fell off or a barely or just leather hard small piece of detail fell off, it hard to reattach. Lastly, for me, it was also difficult because you were unintentionally making stray marks with your fingerprint, finger nail and other clay tools that you didn't want and it was tedious having to smooth out or filled these mark. Something that I found that was successful was that the slip and score method is very easy to do and very effective, it's easy to attach large pieces and small piece with each other by wetting and scoring or scraping, with a scraper or scoring rib, the sides of both the pieces you want to attach and none of the pieces are very moveable and haven't fallen off after using this method that created something that is similar to velcro so the pieces are attached strongly and firmly. Something else that I found that was successful was how versatile new and moist clay, it's very moldable and can be used to form a lot of different shapes for my clay piece, and i was able to create all the shapes that i wanted to make. It's also easy to cover any small mistakes or cracks you may have by just adding a bit of water and smoothing it out and/or adding just a little bit of clay. Something else that I found that was successful was that clay the is very easy to cut, a very smooth cut, and when the clay is about leather hard or a little bit dryer, it's easy to carve in things like designs, to things more smooth or to get rid of unwanted bits or, like me, to create some dents or slots for a piece to fit in, in my case I carved a bit of my lid so that it was abe to fit over the strands of ribbons on the four sides of the box. My piece is also successful because it turning out the way I want it to look, it looks just like a norml present would and the cap fits perfectly with a bit of adjustments to the lid and carving slots in the cap to fit of the ribbons. The ribbons and bow on top turned out the way I want them to, the ribbons look like they all connect to the one bow on top of my lid and I'm very fond of my bow, it's very similar to what a normal bow would look like and very relisti and the structure and shape of the clay piece is realistic and is mostly just like a common gift box. I first rolled out a ball of moist clay into a long piece of flat clay that was about 1/4 of an inch thick and cutted out four square soft slabs that were 4 inches by 4 inches and cutted out two more slabs that were 4 and 1/2 inches by 4 and 1/2 inches, then I separated each slab with paper and stored them. The next day I attached the four square, now hard slabs that were 4 inches by 4 inches in a rotation like form to form the four sides of my box and used attached them using the slip and score method using water and the scraper and wetting and scraping the areas of the two sides of the piece I wanted to attach to each other. Then, I put the four connected slabs, that are the sides for my box, on top of one of my 4 and 1/2 inches by 4 and 1/2 inches slab and cutted any access of clay of off that were along the edges of the four connected sides of my box and connected the remaining slab to form the bottom using the slip and core method and made some adjustments to make the bottom fit and to make it a flat bottom and to get and slivers of access I might've missed and to smooth out the crack from where the four sides meet the bottom piece so the bottom piece looks like it's connected and it's better attached and to make the piece just look more like a box. Then I smoothed out and cracks, including smoothing out the cracks from where the four sides meet the bottom but not from the out sides like last time but from the inside of the box so that it could be better attached, and any unintional marks I might've made. Then while the the other 4 and 1/2 inches by 4 and 1/2 inches slab is still in the greenware stage, I cutted out 4 pieces that were about 4 and 1/2 inches by 1 inch, and attached these pieces to each of the four sides of slab. Then I made some adjustments to 4 pieces, cutting them and attaching small pieces of clay to where they need to be and smooth out the cracks where the piece meet on the sides and the cracks where the pieces are attached to the slab, so that the lid actually looks like the lid of a gift box. Then I cutted out another four pieces that were 4 and 1/2 inches by 1 and these in half dept wise to make them thinner and attached these to the center of the four sides of my box for the strands of ribbons and made any adjustments that were needed. Then I cutted out another three pieces that were 4 and 1/2 inches by 1 and folded thes together and shaped them a bit to make a bow. I attached the bow to the center of the lid then cutted out four pieces that were 3 inches by 1 inch, cut those dept wise, and attached them to the four sides of of the lid, folding them over the top of the lid and the extra pieces attached on the sides and the pieces connect to the bow in the center of the lid. Then I realized that the cap I made wouldn't fit since I added the ribbons to the sides of my box so I carved dents/slots in my lid so that the ribbons fit into the slots and the lid can fit the box. I made the slots as neat and unnoticeable as possible and made sure the lid could nwo fit the box. Then the last step in my process that I've done so far is smooth out any bumps I didn't want and any stray or unintentional marks with water and moist clay.
0 Comments
Leave a Reply. |
CatherineAspiring to do something. Archives
May 2019
Categories |
 RSS Feed
